How to calibrate the print head of inkjet t shirt printer?
Fedar inkjet t shirt printer manufacturers have compiled some methods for your reference.
1.Epson DX5 print head of fedar inkjet t shirt printer calibration
①Vertical calibration
In the "Print Settings" interface, click the "Vertical Calibration" button, and fedar inkjet t shirt printer’s system will print out the image of the vertical calibration, as shown in the figure below:
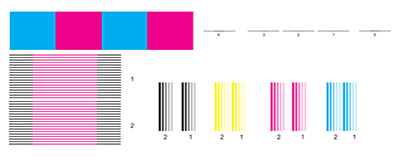
Judge the verticality of fedar inkjet t shirt printer head according to the splicing situation of the upper and lower end junctions in the figure. If it is not spliced into a straight line, you need to manually adjust the physical position of fedar inkjet t shirt printer head until the upper and lower lines are in a straight line.
②Step calibration
Click the "Step Calibration" button and fedar inkjet t shirt printer system will print out the step calibration pattern, as shown in the figure below:
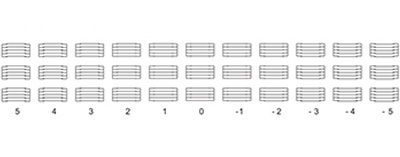
When adjusting, read the correction value of the step parameter from the correction unit that can only be blamed on the printed diagram. The reading method is: there will be a corresponding number above each line in the diagram, and the black line is the reference line. Find out another color that the value above the line with the best coincidence between the line and the reference line is the offset value. Next, click the "Step-by-step calibration" button, the system will pop out another small window, fill in the offset value read into the deviation value box in the figure, click "OK" to return to the previous menu, step calibration carry out.
③Double printer head calibration
Click the "Vertical Alignment" button, fedar inkjet t shirt printer will print out the following image:
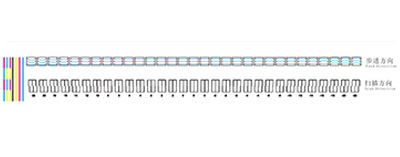
Find the number corresponding to the vertical alignment of the printed scan direction, add the basic values of the selection box on the horizontal calibration, (note the addition and subtraction of positive and negative numbers, remember to apply after changing) until the vertical line of "0" is Straight, then ok.
Find the number corresponding to the horizontal alignment of the printed step direction, add the basic values of the selection box under the horizontal calibration, (note the addition and subtraction of positive and negative numbers, remember to apply after changing) until the vertical line of "0" is straight, then ok.
④Two-way calibration:
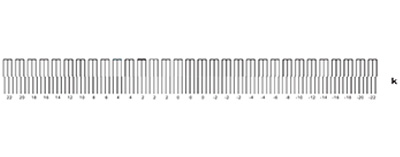
Add the value corresponding to the vertical line of the K channel with the basic value of the K channel of the software, (note the addition and subtraction of positive and negative numbers, remember to apply after the change) until the vertical line of 0 is straight, and then confirm. (Counting from the left, one row of the aisle is 1234 and the second row is 5678)
Remarks: The above calibration functions are required to adjust fedar inkjet t shirt printer head parameters. Please set the calibration according to the XPrint interface. Generally, the "color register" defaults and does not require calibration.
2.Epson 5113 print head of fedar inkjet t shirt printer calibration
①Vertical calibration:
In the "Print Settings" interface, click the "Vertical Calibration" button, and fedar inkjet t shirt printer system will print out the image of the vertical calibration, as shown in the figure below:
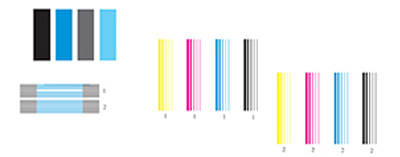
Judge the verticality of the print head according to the splicing of the upper and lower ends in the figure. If it is not spliced into a straight line, you need to manually adjust the physical position of fedar inkjet t shirt printer head until the upper and lower lines are in a straight line. (1 is the vertical calibration diagram of printhead 1, and 2 is the vertical calibration diagram of printhead 2.)
Adjust the vertical splicing between the two printer heads according to the gap between the color blocks printed later.
②Step calibration
Click the "Step Calibration" button and fedar inkjet t shirt printer system will print out the step calibration pattern, as shown in the figure below:
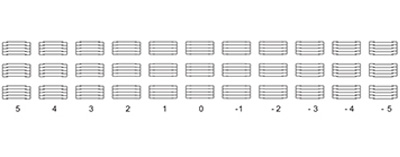
When adjusting, read the correction value of the step parameter from the correction unit in the printed diagram. The reading method is: there will be a corresponding number above each line in the diagram, and the black line is the reference line. Find out another color line with the best baseline coincidence is the offset value. Next, click the "Step-by-step calibration" button, the system will pop out another small window, fill in the offset value read into the deviation value box in the figure, click "OK" to return to the previous menu, step calibration carry out.
③Double printer head calibration:
Click the "Vertical Alignment" button, fedar inkjet t shirt printer will print out the following image:
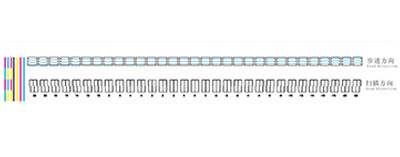
Find the number corresponding to the vertical line alignment in the left direction, and add the basic value of the selection box on the horizontal calibration (note the addition and subtraction of positive and negative numbers, remember to apply after changing) until the position of "0" the vertical line is straight , And then confirm.
Find the number corresponding to the horizontal line alignment in the right direction, and add the basic values of the selection box under the horizontal calibration (note the addition and subtraction of positive and negative numbers, remember to apply after changing) until the position of "0", the vertical line is straight , And then ok.
④Two-way calibration:
Click "Two-way Calibration", fedar inkjet t shirt printer will print out the following picture:
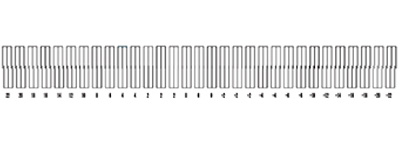
Add the value corresponding to the vertical line of the K channel with the basic value of the K channel of the software, (note the addition and subtraction of positive and negative numbers, remember to apply after the change) until the vertical line of 0 is straight, and then confirm.


